Thinking Outside of the PC Box
Or: A
Technophobe Builds a PC
by Jim
Bray
Part Three:
Slot Machines and other "Mounting Concerns"
This series
details my experiences at assembling a Windows-based PC tailored to what I do
and what I need in a computer. I'll also include links to the various
manufacturers involved, whenever possible, so you can take a closer look at the
components in this system. Those links will open in a new window. You can also
link to more in depth TechnoFILE reviews of each component tried.
I'm building a
PC!
Little ol' me,
the guy with the black technological cloud that follows him around!
As outlined in
the previous columns, I've gathered together
the bits for a beautiful new PC - which is a nice way to ensure you get exactly
the components and performance you want.
Last time around, I mounted the CPU, motherboard,
RAM, floppy drive, and all that other fun stuff, into the case. Now I have a
(theoretically) functioning PC, ready for the installation of the SCSI
interface, Video card, the modem, and the hard, DVD and CD-R drives.
Piece of
cake!
Sliding
Home...
All the
expansion cards mount in the same way, whether ISA, PCI, or AGP. AGP and PCI
slots look very similar - except that on my motherboard the AGP slot is brown
(and mounted a bit more to the rear) and the PCI ones are "cream colored." The
ISA slots are brown and much longer than the other types. Each type is
clustered together, so they aren't hard to find.
The first step
in installing expansion cards is to remove the little metal "tabs" that cover
over the holes in the case through which the "business end" of the expansion
cards stick. This is done by removing one little screw and taking out the
piece. Hold onto the screw; you'll want to use it when you mount the expansion
card.
And placing
those expansion cards is easy - but remember to be careful, and make sure you
aren't a "carrier" of static electricity (a caveat that applies throughout this
entire construction process).
Grip the card
firmly (not so firmly as to break it, though!) by the edges, trying to avoid
all the chips and other arcane stuff, and slide it firmly yet gently - and
keeping it straight - into whichever expansion slot you've chosen for
it.
On my Gigabyte
motherboard, the expansion slots are arranged (from top to bottom as the PC
stands on my desk) as follows: 1 AGP, 4 PCI, 1 "shared" PCI/ISA (you can mount
either, but not both) and 1 "standalone" ISA.
I decided,
completely arbitrarily, to install the cards from what would be the top when
the PC is stood up to what would be the bottom , which meant the AGP slot is
first - so the video card is the first victim.
Pictures
Perfect...
Mounting the
ATI All-in-Wonder 128 video card, reviewed
here, was a little
more complex than some of the other installations, but only because there are
so many nifty attachments that come with it.
After the card
is in its slot, you can hook up the TV antenna/cable to it, as well as attach
the other audio/video input/output cables. These are marked clearly in the
product's documentation. The connectors only connect one way, so if you find
you're really having to push, don't; you probably have it turned around. Once
you've ensured the little pins are aligned properly they should slide easily
into place.
If you're using
a conventional sound card, you'll want to hook the "audio out" jack (the
smallest of the three black output wires that spread out from the connection
point) to the "input" jack on your sound card. In my installation, the cable
needs an extension so it can plug into the subwoofer unit of the DSS 80 sound
system.
The TV cable
connector hooks up exactly the same way it does to your TV and/or VCR; you
can't miss it.
Once you have
all your connection ducks in order you're finished with this part.
Oh, don't
forget to hook in your monitor! It mounts right to the video card and the
connector - and method of connecting - is obvious.
 Getting
SCSI …
Getting
SCSI …
The next slot
was earmarked for the SCSI interface. Why? Why not?
Going SCSI for
the hard drive and other peripherals wasn't my first choice but, looking back
on it now, I'm glad I went that way.
Adaptec's SCSI
Card 2940U2W
"ultra wide" interface (reviewed
here) is very, very
fast. The manufacturer says it'll let data zip across it at up to 80 MByte/sec.
Installation is
very straightforward: the card slides into a PCI expansion slot the same way
the other expansion cards do. The internally-mounted peripherals (CD-R, Hard
Drive, etc.) will connect directly to this card via a big pink "ribbon
cable."
External Ultra
Wide SCSI components (of which I have none) can be connected to the Adaptec
card at the back of the PC, just like the monitor, printer, etc. hook into
their respective connectors.Adaptec also gives you an extra doohickey that mounts over another
"hole" on the back of the case (but which doesn't take up an expansion slot).
This is for narrower SCSI connectors (like my scanner).
This secondary
connection point is actually attached to the main SCSI card with the same big
pink cable that extends through the case to the internal SCSI devices, so make
sure you attach your devices with this extra length requirement (it has to
snake around to the back of the case again after you've hooked everything else
in) in mind if you need to use that type of connection. I did, so I
did.
Now, thanks to
the circuitous route of this cable through the case, the PC's guts look as tidy
as my desk - so I suppose it's appropriate.
Other than the
network card that connects the PC to the server (which isn't a part of this
project and so will therefore never be mentioned again - except to say that it
mounts in exactly the say way as the other expansion cards), that took care of
the PCI slots. The only thing left was to install the modem.
This went into
the ISA slot at the other end of the line. As mentioned (it seems ad nauseam),
it mounts in the same way as the other cards. Once it's placed you can hook in
the phone lines.
Remember to get
the "to phone" and "to wall" lines connected to the right ports on the modem.
As usual, however, they should be clearly labeled - either right on the modem
or in the documentation. If you get it backwards you'll find out when you try
to use it - and all you have to do at that point is swap the two phone cables.
Don't forget to
screw the expansion cards into place with the screws you removed earlier, from
those little metal tabs covering the holes in the case. This'll hold them
tightly in place. Don't screw so tightly as to cause the cards to bend or come
partially out of their slots!
That's it! All
the expansion cards are in place.
Now to mount
the drives...
Hard Drivin'
Man..
By this time I
felt I could do anything (of course, the software installation would put the
lie to that!), so I tackled the rest of the installation with gusto.
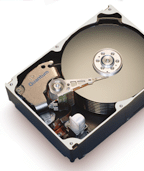 First was the
Quantum hard drive. It's a tiny little bugger - despite having a whopping
18.2 GB capacity - so I mounted it in the case's 3.5 inch drive bays,
immediately below the floppy drive.
First was the
Quantum hard drive. It's a tiny little bugger - despite having a whopping
18.2 GB capacity - so I mounted it in the case's 3.5 inch drive bays,
immediately below the floppy drive.
First, you have
to ensure that it's set to the correct SCSI address, which is another occasion
in which you'll need to have the manual around. The address is set with those
damn jumpers, so you'll want either a pair of needlenose pliers or slender
fingers. This is a procedure you'll follow with each SCSI component.
The actual
process is easy. If adjustment is necessary, you just pull jumpers from one set
of wires and reinsert them over the correct ones.
Once you've
done that, you can mount and connect the drive.It slides easily into place and
has four screws with which to fasten it to the case.
Then I
connected the hard drive to the SCSI card, via a vacant connector attached to
that big pink ribbon cable mentioned earlier.
The other
connection is to the power supply, which is also easy. Just find a "female"
connector on the harness of wires you're already using to send power to the
motherboard, floppy drive, etc. and hook the power cable there. Slide the other
endinto the
receptacle on the drive. It only goes one way, fortunately, so conscious
thought is unnecessary (also, fortunately).
Voila!
The Quantum
drive, which really does operate at something approaching warp speed, is
reviewed here.
The
ACS Compro CD-R
drive, reviewed here, mounts in exactly the same way, except that it goes into
a 5.25 inch bay which, in my Gigastar case, means it goes higher up. Connection
is also identical, using another connector on the same SCSI cable and to the
power harness.
The
monkeywrench...
As mentioned in
Part One, Pioneer mistakenly sent the wrong
DVD ROM drive
from the one we'd requested. Instead of receiving the SCSI model 303, we
unpacked the IDE model 103, reviewed
here. This wasn't a
big deal, fortunately, except that it made me string an extra IDE cable through
the system's increasingly crowded innards, instead of merely hooking it in via
the existing SCSI cable.
It was probably
quite funny to watch me wrestle with this unintentional switcheroo. The
documentation with the drive said it was the SCSI version, so I tried in vain
to connect it with that big pink ribbon. When that didn't work, I tried a
different SCSI cable that came with the Adaptec, thinking that perhaps it was
merely the connector on the drive that was different.
But no, it was
not to be. At least I learned why the different connectors have different
sizes: only an IDE connector fit! Oh, well.
Other than
that, the drive mounts and connects in exactly the same was as the CD-R, and
into a neighboring 5.25 inch drive bay (in this case, directly above the
CD-R).
The next thing
to connect was Microsoft's Digital Sound System 80, which we reviewed
here.
Since this is a
USB component, hookup is child's play: just run the USB cable from the
subwoofer unit to one of the USB ports on the PC's motherboard. Other
connections for the sound system include wiring the satellite speakers into the
subwoofer unit, and plugging the whole shebang into a wall
receptacle.
I also had to
connect the "audio out" from the ATI video card (so the TV tuner, etc. would
work) to the input jack on the subwoofer, which required getting an extension
cord.
Overall, it was
simple, quick, and painless.
The Wombat
keyboard, reviewed here, doesn't actually hook up to the motherboard. Since it's
wireless, you hook the infrared receiving unit into the motherboard. The remote
sensor unit has outputs for keyboard and mouse, and they hook into the keyboard
and mouse ports on the motherboard. Both ports look the same, so you have to be
careful here to get them straight. They're labeled with little icons, but
they're hard to see if, like me, you're becoming blind as a bat to things up
close.
Actually, that
"blindness up close" was one of my biggest problems with this assembly process
- especially when it came to little things like jumpers. I found I needed my
reading glasses, a flashlight and, sometimes, my son's vision.
Don't worry if
you reverse the keyboard and mouse connections; nothing will blow up. You just
won't be able to use either input device until you've switched them
around.
I chose not to
use the Wombat's mouse, preferring my MS
Intellimouse, so I only connected
the keyboard output to the motherboard.
Oh! You'll also
need to put the AA batteries (which are included) into the keyboard.
The end of
the beginning...
That completed
the hardware side of things - which was by far the most frightening part for
me.
Next came the
real work: installing the operating system,drivers, and software applications
and seeing if my hard work would pay off.
Or if I'd flip
the power switch and be greeted by a bright flash, a loud crash, and clouds of
billowing black smoke.
Stay
Tuned!
Next:
Powerup!
Tell us at TechnoFile what YOU think

