Thinking Outside of the PC Box
Or: A
Technophobe Builds a PC
by Jim
Bray
Part Two: The
Chips are Down/a Mother of a Board
This series
details my experiences at assembling a Windows-based PC tailored to what I do
and what I need in a computer. I'll also include links to the various
manufacturers involved, whenever possible, so you can take a closer look at the
components in this system. Those links will open in a new window. You can also
link to more in depth TechnoFILE reviews of each component
tried.
I'm building a
PC!
Little ol' me,
the guy with the black technological cloud that follows him around!
As outlined in
the previous column, I've gathered together the
bits for a beautiful new PC - which is a nice way to ensure you get exactly the
components and performance you want.
Now begins the
process of putting together all the pieces.
 First things
first…
First things
first…
Since Intel is
the leader in the CPU world, I wanted to see how one of the "other brands" of
microprocessor measured up. "Other brand" CPU's can be less expensive than
Intel's flagship product and, according to their hype, work as well or better.
So let's find
out.
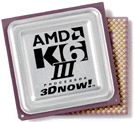
I'd heard good
things about AMD microprocessors, so I hit them up for one of their new ones
and they kindly obliged with a
400
megahertz K6-III. This chip competes head to head with the Intel Pentium
III.
Since it
arrived - and before I had a chance to finish this series - AMD has released a
new series, the Athlon, which it claims is the fastest PC processor on the
market. This figures; but for my purposes, including using my new system as a
benchmark for comparing other PC systems, the K6-III 400 is more than adequate
- for now.Click
here for more in depth
coverage of the AMD K6-III
400 CPU.
 For the motherboard
in which to mount the AMD, we chose a Gigabyte GA-5AX ATX, distributed
in Canada by Peripheral
Express, who made the board available for this project. The Gigabyte
is a very easy board to configure since, for the most part, it uses DIP
switches instead of jumpers.
For the motherboard
in which to mount the AMD, we chose a Gigabyte GA-5AX ATX, distributed
in Canada by Peripheral
Express, who made the board available for this project. The Gigabyte
is a very easy board to configure since, for the most part, it uses DIP
switches instead of jumpers.
(Right:
the motherboard. The CPU/fan mount in the white square at the center top. To
the right are the sockets for the RAM. The five white slots at the center
bottom are PCI expansion slots, with two black ISA slots below them.) Click
here for a more
in depth look at the motherboard.
Go
configure…
This
motherboard configuration process you have to go through sets the voltage, bus
speed and "clock multiplier" (which makes the CPU's internal clock relate
properly with the motherboard's).
I had to visit
AMD's web site to find a diagram for the DIP switch configuration. AMD's
diagram was explicit - but it was in black and white. This led to me confusing
"off" with "on" and setting the switches to exactly the opposite of where they
should be. Of course, I didn't notice this until the system was all together
and fired up.
Fortunately,
all it meant was that the motherboard thought it was hosting a slower processor
than it was - and once the correction was made everything was fine.
DIP switches
are easy: you just switch 'em one way or the other with your fingertip.
Jumpers, a common alternative to DIP switches, are another matter entirely.
They're horrid little plastic anomalies that mount over three wire sets,
"jumping" two of them to direct the electrical current in the proper direction.
I hate them. They're fussy, break easily, and are hard to see and/or handle.
This is the main reason why I chose the Gigabyte motherboard. It only uses
three jumpers and, I'm happy to say, they were already adjusted correctly for
my K6-III right out of the box.
Lucky me!
With the motherboard (supposedly!)
configured, it was time to install the K6-III CPU - the heart of the entire
system.
Sure, I was
scared. Who wouldn't be? But the chip mounts easily and you can't put it in
wrong unless you take a hammer to it - which, for obvious reasons, wouldn't be
recommended. All that's required to correctly mount the CPU is matching the
"different" corner of the chip with the corresponding place on the
motherboard's socket; the chip drops right into place.
You then mount
the CPU fan on top of the chip (which is also fairly straightforward, though it
required a bit of fiddling) and you're off to the horsepower races.
 The
next step is to install the motherboard into the case. The ATX-style board
mounts into the ATX case with six screws, but before you put in the screws
you have to mount the "screw holders." These are little gold doohickeys
with a "male" screw end and a "female" socket on the other.
The
next step is to install the motherboard into the case. The ATX-style board
mounts into the ATX case with six screws, but before you put in the screws
you have to mount the "screw holders." These are little gold doohickeys
with a "male" screw end and a "female" socket on the other.
First, place
the motherboard onto the case's motherboard mounting studs (you can't miss
them) and line it up to find which studs are the right ones for your
motherboard. Then, take the motherboard off again and put the "screw holders"
into the appropriate mounts. Once that's done, all you have to do is line the
motherboard up again and insert the screws, which go right into the "screw
holders" you've just mounted.
Don't tighten
too much or you can crack the motherboard!
Adding the RAM
memory takes about half a minute once you've located the proper slots. On the
Gigabyte motherboard they're a series of brown slots mounted right near the
CPU. The RAM clips into place easily and, since it also only goes in one way,
it's tough to screw up. We mounted SDRAM - Synchronous Dynamic RAM - mounted in
what are called "Double Inline Memory Modules" (DIMM's). This is standard stuff
nowadays.
You can add
your RAM before mounting the motherboard, but my son advised me not to because
once the motherboard's securely in place you have a more solid platform with
which to work. And, as usual, he was right.
Check the
mounting situation before you screw down the motherboard, though, because some
PC cases can get in the way of the RAM's sockets, making installation more
difficult if the motherboard's already aboard.
I also had to
attach the floppy disk controller cable to the floppy drive connection on the
motherboard. I'm not going to update that dinosaur of a drive, so I'm using my
old floppy disk drive. Why change now, considering the number of times I use
floppies these days?
Anyway, the
floppy drive connector is mounted on the motherboard right near the RAM (next
to a pair of IDE controllers that look very similar but which are larger), and
the connection is straightforward - though you have to make sure you get it
right or it won't work. The other end hooks into the floppy drive (easily,
too); you also have to connect the power from the drive to the motherboard - as
in the following paragraph.
The final
hookups for this part of the project are for the various other thingys on the
case: connections for the "power" and "reset" buttons and the LED that tells
you when (or, as has usually been my experience over the years, if) your hard
drive is operating.
These
connectors (little sets of wires terminating in beige plastic thingys) only
work one way - though they can be connected in a variety of ways - so once
again you have to get it right.
There's a whole
series of "jumper-like" mounts onto which these connectors connect, and finding
the right one can be a pain. This is where you'll want to check with the
manual that accompanies the motherboard.
The final
connection on the motherboard is for the case's power supply. This is clearly
marked and only connects one way, so it's hard to screw it up.
And I didn't!
Relatively
speaking, everything I did so far was fairly painless and - except for the
reversed DIP switches (which, as mentioned, I hadn't yet discovered) - the
configuration ended up working just fine when I eventually plugged the system
in and breathlessly pressed the power button.
But it isn't
yet time to do this...
I was also very
grateful to find the installation - so far - was virtually bozo proof (after
all, I did it!), and this gave me the confidence to press on with the
installation of all the other neat toys.
Next: -
things get really "SCSI" as I install the interface
cards, hard drive, and other marvelous toys.
Tell us at TechnoFile what YOU think

